Assembly and maintenance
Here you will find individual information pages on the assembly and maintenance of locking cylinders.
Determining the lengths for locking cylinders
With our cylinder gauge, this is even possible without removing your old lock cylinder.
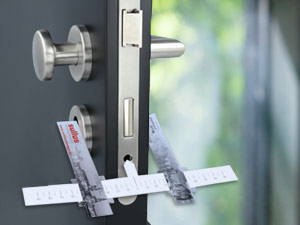
Delivery and assembly of the cylinder gauge
The gauge is supplied in 3 individual parts. The plugging together is possible without any problems. Through the pre-cut slots of the legs is pushed the part printed with the length scale. It should be noted that the laterally protruding parts of the legs (left and right each 5 mm) are placed on the opposite side of the scale.
You can find a detailed description of the gauge in our "Downloads".
The legs are the same width on the scale side over the full length.
Please check the length indication on the scale with a ruler. If mounted correctly, the readable dimension is correct.
Measuring the cylinders
The tip of the cylinder gauge is placed on the center of the fixing screw (used to secure the locking cylinders). The two legs are then pushed up to the door leaf or the existing protective fittings (or rosette). Please ensure that the legs are aligned parallel to the door leaf to avoid measuring errors. Now both values (outside and inside) for the required cylinder length can be read off. When specifying the lengths, for example: 35 / 45, the first measurement is always the length for the outer dimension!
Removal of a profile cylinder
Standard doors
To remove a profile cylinder, first insert the key into the cylinder as far as it will go. In the case of a knob turning cylinder, the knob is of course used instead of the key. Now the forend screw (can be Phillips or but also a slotted screw) is to be unscrewed.
Please do not use a drill screwdriver. Here, manual work is better. If the forend screw was overtightened, (can happen when screwing in, but also when unscrewing) the problems start. Then only patience and some skill will help. Without removing the forend screw, the cylinder is also not to get out!
The key is from the zero position (trigger position of the key) 30 ° left or right (here is the zero position of the locking cam) to turn. By turning it, you try to pull the cylinder out of the PZ hole of the protective fitting. If this is not possible without problems, it is advisable to loosen the fitting slightly. This removes any tension from the profile cylinder. Pulling it out should then no longer be a problem.
Biffar doors
For Biffar doors, first remove the hardware on the inside. From the recess in the lock case, you can tell if it is a locking cylinder with Biffar cam. You can recognize this cam by the 2 opposite locking lugs (normal cams have only one locking lug). Proceed in the same way as for standard cylinders. Unscrew the forend screw and then turn the cylinder with the door open by turning the cam with the help of a key to the trigger position and pull out the cylinder.
Multiple locks with gear wheel
(e.g. MVS 800 of the company Grundmann, installed in high-quality security doors of the former companies Wassner Ges.mbH and Wassner & Partner GmbH)
High caution is required here!
After the forend screw has been loosened or unscrewed, the position of the gear must not be changed!
So there must be no key in the cylinder. If the cylinder with gear (usually Multilock) is twisted without a forend screw, the tooth mechanism inside the multipoint locking system is also brought into an undefined position. As a result, the door can no longer be locked or opened. A reset is only possible with considerable effort.

If the recess for a gear wheel is visible, do not use a key. The cylinder is to be pulled out of the mortise lock after removing the faceplate screw without a key being inserted! If there is a turning knob on the Lock cylinder, the cylinder must first be moved to the neutral position with the door open. Only then may the cylinder be removed without twisting the cylinder.
When installing knob turning cylinders, the knob must be unscrewed and the cylinder brought to the zero position (here the key is removed) by means of a key. Then, without turning the knob rotor, the cylinder must be pushed into the multipoint lock and fixed with the faceplate screw. Only then may the key or knob be turned.
Installation of the new locking cylinder
The installation of a new lock cylinder is not a big act. This can be done in a few minutes. It is done analogously to the removal in reverse order.
Maintenance and care of locking cylinders
Wrong or insufficient care of locking cylinders can lead to the loss of warranty claims.
To maintain serviceability, be sure to follow the manufacturer's recommended care instructions.

Wrong or insufficient care of locking cylinders can lead to the loss of warranty claims.
To maintain serviceability, be sure to follow the manufacturer's recommended care instructions.
In the supplied care instructions and installation instructions are given recommendations on care frequency and the care products to be applied.
You can download these, for the products distributed by us, in our download area to the respective manufacturer.
Without care, the profile cylinders already show signs of wear and extreme wear after a short time. Incorrect care is, for example, when residue-forming agents are used that lead to gumming, such as oil or graphite.
If a complaint is made about a profile cylinder and the failure is not due to technical malfunction (defective parts), the cylinder is usually disassembled. If residues or traces of other agents are detected in the process, a warranty will also be rejected.
Under certain circumstances, however, this test will then also be charged.
Precision cylinders should not be treated with graphite. A combination with oil or other agents is usually "deadly" for the lock cylinder. It comes to bonding of the applied agents. Subsequent removal is not possible without disassembly. The smoother a key is, the lower is also the wear in the cylinder.
Variously encountered "ratcheting", however, has nothing to do with lack of care. This ratcheting is triggered by special pins and scanning inside the profile cylinder. As a rule, this achieves post-locking security and a defined trigger position of the key.
The manufacturers of profile cylinders have searched and found suitable means in long test series, usually spray. There is no single spray that can be used for all types of cylinders. Only the spray or care agent specified by the manufacturer should be used. This guarantees long maintenance cycles and low wear with a long service life.
How to change the camlock cylinder?
We explain in the video how to change your camlock cylinder easily and quickly with the help of our templates.
Should an adjustment of the installation hole be necessary, use our templates for the adjustment of the installation hole. The templates can be found under the respective camlock cylinder in the "Downloads" section.
Installation of thecamlock cylinder
The installation of a new mailbox cylinder is relatively simple.
Remove the old cylinder and, if necessary, adjust the installation hole to fit the new cylinder.
Insert the new camlock cylinder by tilting the cylinder slightly. In some cases, it may be necessary to remove the lever in order to install the cylinder.
Using the nut or clamp spring provided, attach the new cylinder. When doing so, make sure that the cylinder cannot move and is properly seated.
With the camlock door open, check whether the camlock cylinder can be closed properly with the associated key.